Deploy Minio in Openshift
Publish Date: 2024-09-30

MinIO is a Kubernetes-native high performance object store with an S3-compatible API. The MinIO Kubernetes Operator supports deploying MinIO Tenants onto private and public cloud infrastructures (“Hybrid” Cloud).
In our article today we will see how to deploy the minio operator and tenant on top of Openshift 4.16 where this option is not implemented on Operator hub yet (at least at the time of writing this article).
1. Deploy the Minio Operator
MinIO maintains a Helm-compatible repository at https://operator.min.io.run the following to add this repository to Helm:
helm repo add minio-operator https://operator.min.io
in case helm is not installed in your environment, run the following:
curl https://raw.githubusercontent.com/helm/helm/main/scripts/get-helm-3 | bash
  helm version
  version.BuildInfo{Version:"v3.17.2", GitCommit:"cc0bbbd6d6276b83880042c1ecb34087e84d41eb", GitTreeState:"clean", GoVersion:"go1.23.7"}
now after helm is installed, you can validate the repo contents using helm search:
helm search repo minio-operator
The response should resemble the following:
NAME                            CHART VERSION   APP VERSION     DESCRIPTION
minio-operator/minio-operator   4.3.7           v4.3.7          A Helm chart for MinIO Operator
minio-operator/operator         6.0.1           v6.0.1          A Helm chart for MinIO Operator
minio-operator/tenant           6.0.1           v6.0.1          A Helm chart for MinIO Operator
N.B:The minio-operator/minio-operator is a legacy chart and should not be installed under normal circumstances.
Run the helm install command to install the Operator. The following command specifies and creates a dedicated namespace "minio-operator" for installation:
helm install \
    --namespace minio-operator \
    --create-namespace \
    operator minio-operator/operator
Check the contents to ensure all pods and services have started successfully
kubectl get all -n minio-operator

NAME                                  READY   STATUS    RESTARTS   AGE
pod/minio-operator-699f797b8b-th5bk   1/1     Running   0          25h
pod/minio-operator-699f797b8b-nkrn9   1/1     Running   0          25h

NAME               TYPE        CLUSTER-IP      EXTERNAL-IP   PORT(S)             AGE
service/operator   ClusterIP   10.43.44.204            4221/TCP            25h
service/sts        ClusterIP   10.43.70.4              4223/TCP            25h

NAME                             READY   UP-TO-DATE   AVAILABLE   AGE
deployment.apps/minio-operator   2/2     2            2           25h

NAME                                        DESIRED   CURRENT   READY   AGE
replicaset.apps/minio-operator-79f7bfc48    2         2         2       123m
You can now deploy a tenant using Helm Charts.
1. Deploy the Minio Tenant
Create a local copy of the Helm values.yaml for modification
curl -sLo values.yaml https://raw.githubusercontent.com/minio/operator/master/helm/tenant/values.yaml
Open the values.yaml and edit the following fields :
tenant
  name:  minio

configSecret:
  accessKey: minio
  secretKey: minio123

pools:
  storageClassName: ocs-storagecluster-cephfs

securityContext:
  runAsUser: 1000700000
  runAsGroup: 1000700000
  fsGroup: 1000700000

containerSecurityContext:
  runAsUser: 1000700000
  runAsGroup: 1000700000

requestAutoCert: false
you can change the name of tenant as you wish, also the access key and the secret key, as well as for the security context which depend on your environment. leave other fields as default
Use helm to install the Tenant Chart using your values.yaml as an override:
    helm install \
    --namespace minio-tenant \
    --create-namespace \
    --values values.yaml \
    minio minio-operator/tenant
You can check that all resources are deployed successfully:
oc get all -n minio-tenant
----------------------------------
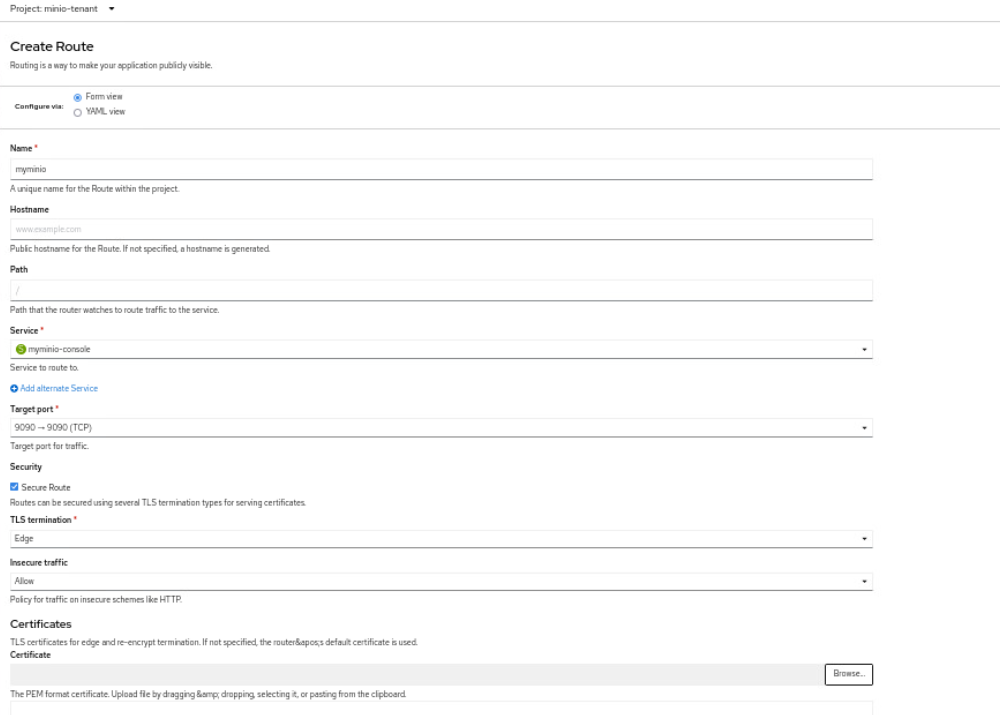
Create a route
From the OpensShift UI and within the minio-tenant namespace, go to Networking > routes, then create a route using the values as shown in the following picture
now you can open the generated url to access the UI of minio tenant, which depend on your cluster base domain, namespace and tenant name. and it should be as follows:
https://minio-minio-tenant.apps.. /"
once you enter the login credentials as specified earlier during the installation:
username: minio
password: minio123
like in this image:

the following picture show up :
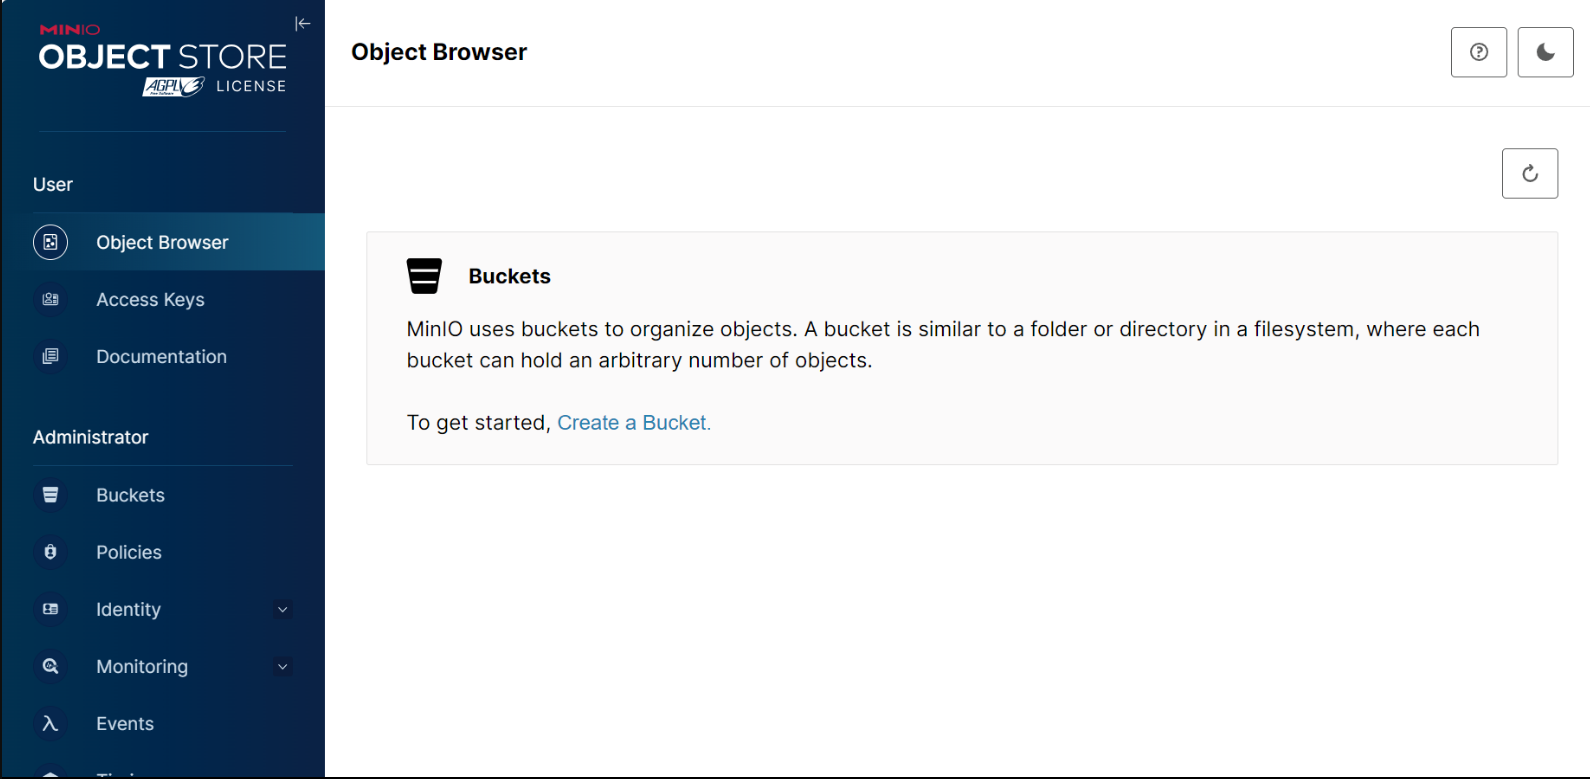
now you can create buckets and upload objects to the minio object store.